DIY Altoids Watercolor Tin
June 21, 2012Watercolors are a very handy paint because they are reusable once dry and you don't need to use a lot of paint to make a good painting. Plus, after a year of struggle, I'm starting to fall in love with watercolors and always like to have them handy.
But unless you are willing to shell out an exuberant amount of money on solid pan watercolors (or are willing to work with kiddie palettes seen in kindergartens around the world), watercolors aren't very portable.
Until you find an Altoids tin and a few hours for crafting. :)
The pictures are pretty self explanatory, so I'm not going to bore you with a bunch of rambling details and interesting tangents. Allons-y!
All you need is an Altoids tin, Mod Podge or another decoupage glue, paint sample cards (the kind with the glossy finish), and some watercolor tubes!
The height of the separators is up to you. 1 cm did the trick for me. It keeps the paint in but gives the tin some wriggle room so I can fit in mini paper, paper towel bits, pencil stubs, and mini paintbrushes, too.
At this point, I realized I needed more accordion-fold-paper-thingamabobbers, made a second one, and glued them together.
I then made some more separators so I could fit more colors into the tin. They are 1 cm wide and nestle into the accordion-fold paper..
Make sure that no paint can escape between the separators. Coat all the edges and corners with 2-3 thick layers of Mod Podge. Drying time between each layer will be exasperatingly long (about an hour) but it's worth it. For good measure, coat everything with Mod Podge just in case your paint card isn't glossy enough to be relatively waterproof.
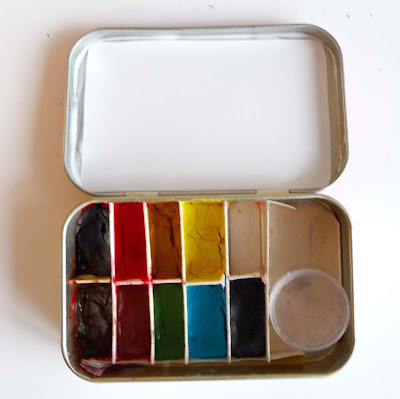
As you can see from this picture, I hadn't properly sealed the separators and the red paint leaked.
These are colors that went into my tin. They don't have color names on them (they are from a set of watercolors my parents gave me when I was 10, and which I've only recently used. Notice how all the tubes are already breaking and paint is squishing and squashing all over the sides-- this is the perfect way to save old tubes of paint that would otherwise be hard to use!).
I wanted a wee container for holding water so that my kit could have everything I need for a tiny painting. After scavenging the house and testing out tiny plastic containers, I decided on the little plastic case that my brother's tiny scapular came in (far right).
I wanted to use the lid as a mixing palette, but didn't like the shiny gray, so I cut a plastic page separator from a notebook and glued it onto the lid.
There is still room to set some paper, paper towels, pencil stubs, and miniature paintbrushes on top of the watercolors.
Of course, it's not finished until you Mod Podge on a hand painted cover. And spelling watercolors the British way is a necessity. *nods gravely*
Overall, this is a fairly quick project that is absolutely free for people who have crafting materials hanging around. Well, the "curiously strong" mints aren't free, but you get to eat those so it's no biggie splurging a couple dollars. :)
If you attempt this project, please leave a comment! I'd love to check it out. :)
I made two tins, and the second was ultra miniature! I used one of those metal and plastic sleeves that allergy pills come in. The holes for the pills are the perfect size for a drop of paint. This one is so small that I can shove it in a pocket or tiny purse with no problem!
UPDATE:
After two years of dragging this tin around with me, it's still going strong! I brought it along with me to college, where it's come in very useful. I'll stash it in my backpack and work on sketchbook homework during my spare time-- or while eating a splurge of a breakfast ten minutes before a lecture class!
I highly recommend that anyone making a travel watercolor box invest in a waterbrush. These are paintbrushes that you can load with water, and they cost less than $7 at most stores.


20 comments