Secret Book Box {Tutorial}
August 10, 2011
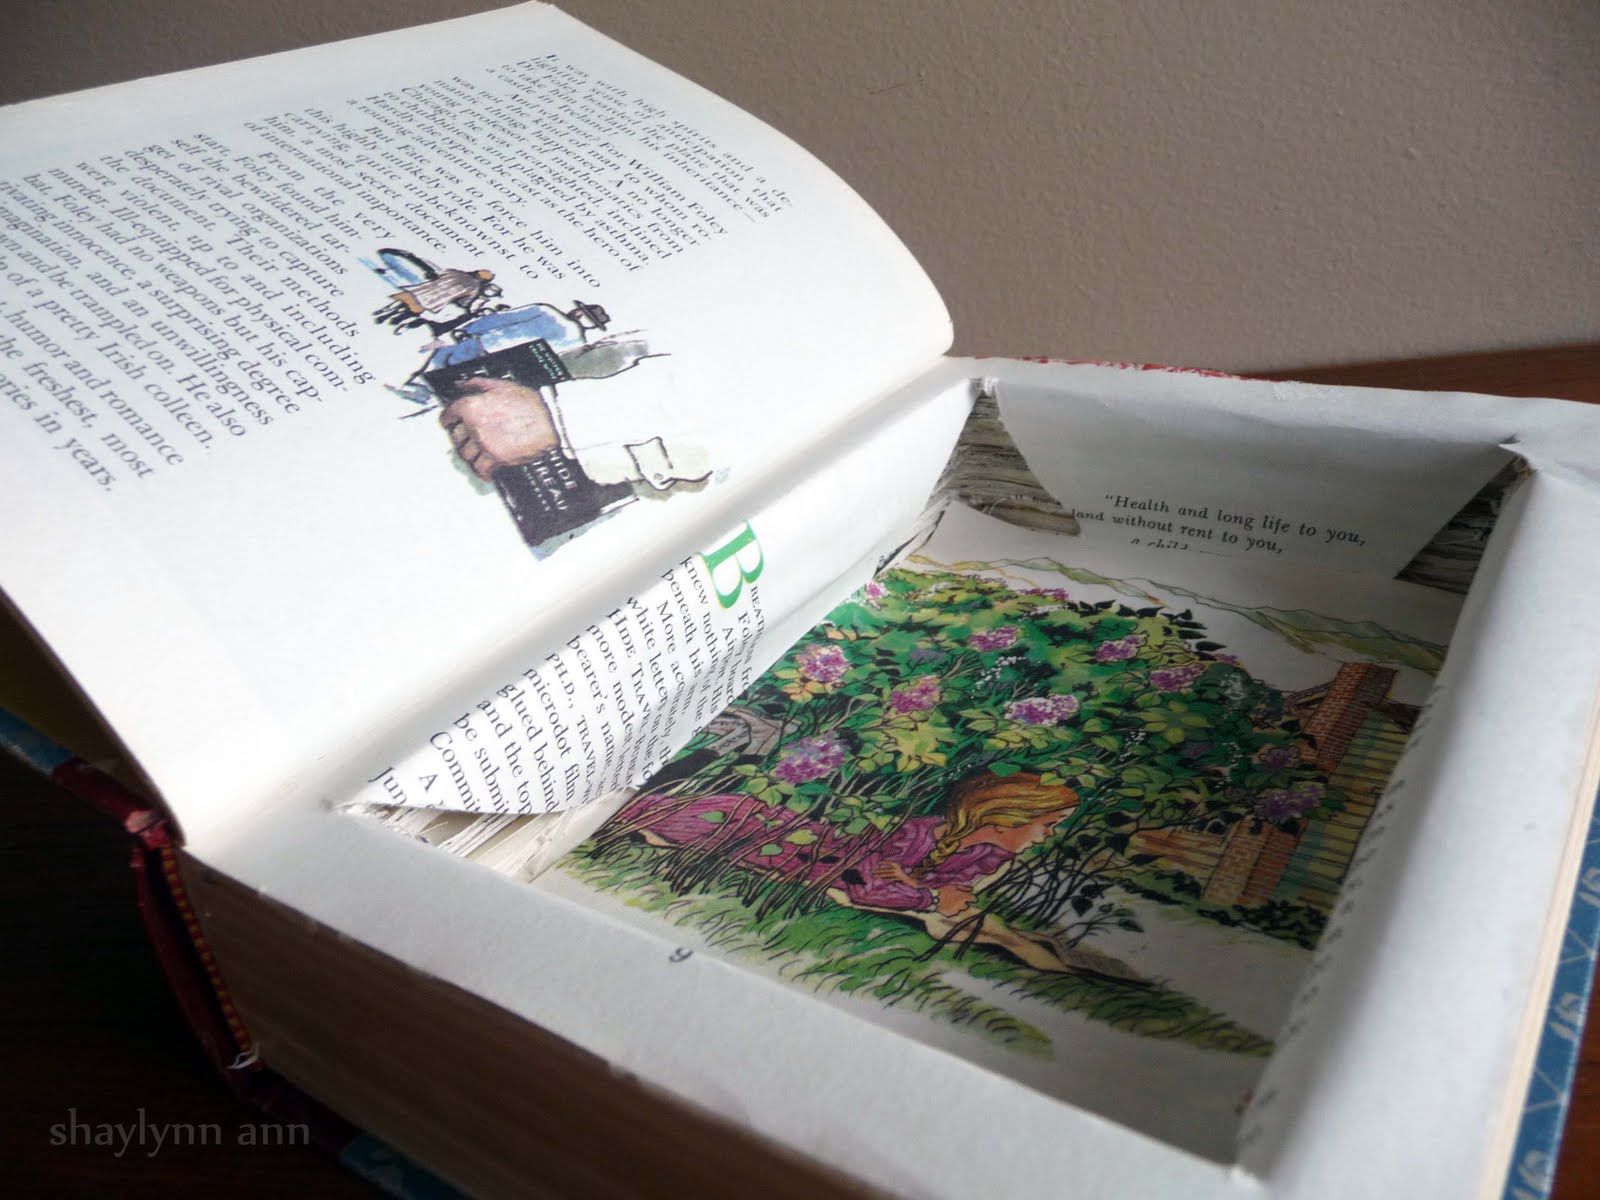
...although I suppose it is not so secret once I've blogged about it, eh?
This is the first project in my Destroyable Books blog series. More about that {here}.
I love books. And I love secrets. And I especially love hollow books.
I've made one before {check it out!}, and my little sister asked if I could make one for her. It was the perfect opportunity to make a tutorial, make the perfect first post in this series, and make my sister smile.
You will need:
- a destroyable book
- an x-acto or utility knife
- extra blades (if you are smarter than I was!)
- Mod Podge
- a plastic baggie and tape
Gather supplies
Begin cutting the paper.
(Leave 3-4 pages in the front uncut.)
You want to cut as evenly as possible (grab a ruler if you need). I used the text margins as a guideline.
Cutting will take a long time. It took me over 2 hours to cut through this 400+ page book.
If at all possible, use several blades. You could easily go through 3 or 4 x-acto blades for this project. Don't have extra blades? It's still possible to make a secret book box! I'm living proof of that. It just got harder and harder to cut the pages nicely.
(My utility knife photo is for tutorial-purposes only. I didn't actually use it because it's blade was more worn out than my x-acto's).
The hardest part is cutting the corners properly. I accidentally tore/bent several pages because I was not careful with the corners.
TIP-- I don't know why I didn't think of this earlier. Before you begin cutting, use an automatic drill to drill a hole in each of the 4 corners (fold the cover back so you don't drill through that). All you have to do then is cut straight lines connecting the dots.
While cutting out the pages, I found this interesting picture. So I had fun with it. :)
Keep cutting. Just keep cutting. Cut, cut, cut. Soon you'll have a nice big pile of papers....
Cut until you are some 10-20 pages shy of the back cover.
Cover the front cover (and the first few pages). This will keep the glue from sticking to the cover.
Mod Podge the outside edges of the book, set them under several heavy things, and let dry.
I would have used dictionaries, but these storybooks were nearer. I think it shows, that I have little siblings.
You also have the option of gluing on the inside of the hollow part-- so that from the outside, the book doesn't look like it has any glue on it.
You're book won't be pretty at this point. The insides will be all ragged...
Take one of the uncut pages from the front and glue it onto the top already-cut page.
Cut it into an X.
Fold the "X" and glue it down.
The edges should look better now.
The next step is to glue a piece of paper on the bottom.
I used an illustration from the book, but you could also use scrapbook paper, etc.
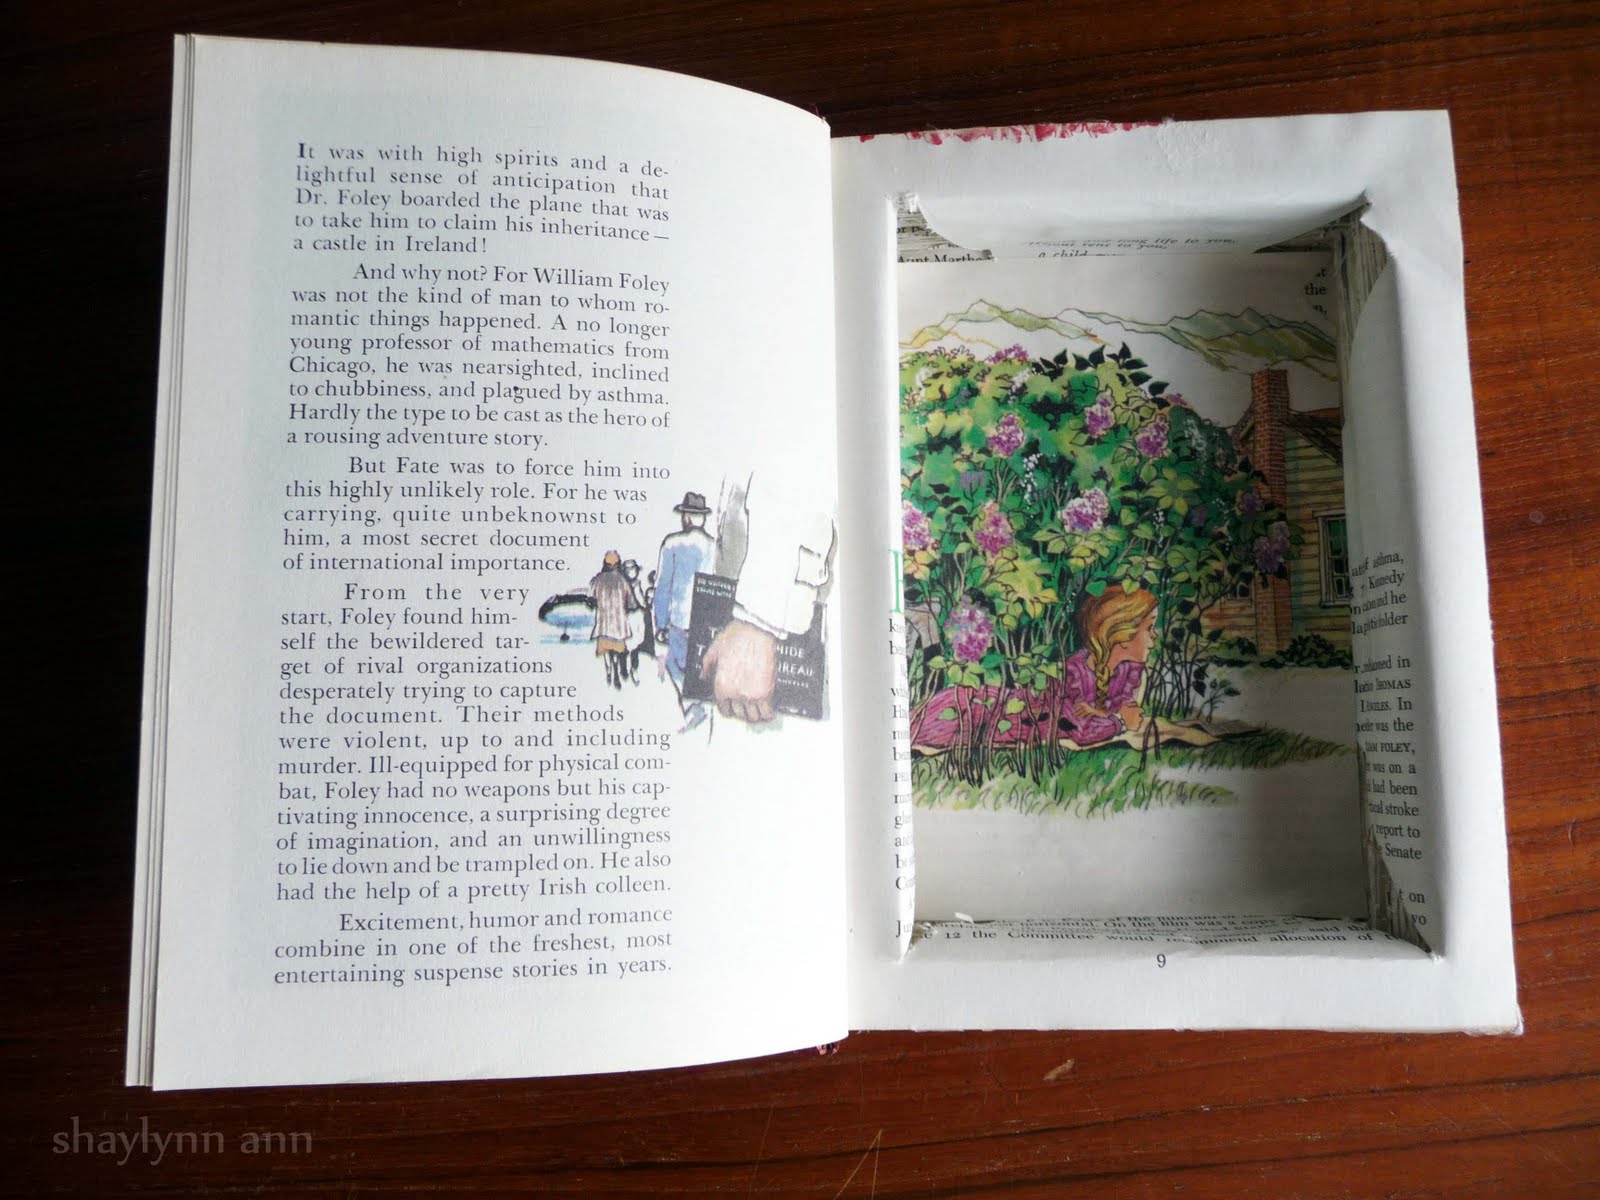
| Addie had me change the picture on the inside |
The finished book safe!
And the proud owner of said book.
Don't you just love little girl treasures?
P.P.S. Want to see more book crafts? You can find them {here}.
Did YOU make something using or inspired by this tutorial? Please leave a comment, I would love to check it out!


25 comments
This is so COOL! Thank you for sharing your idea! It is going in my inspiration folder for sure!
ReplyDeleteBrie from darlingdoodles.blogspot.com
love it!! I have a few books I have been wanting to do this for. Thanks so much for the tutorial!
ReplyDeletewow i bet that took a lot of time to make!! have u seen the new pottermore.com they have sompthing that kind looks like this
ReplyDeleteHi Shealynn! you are amazing! I love your tutorial on making a secret compartment in a book. Did you use something like Photoshop to do the wonderful effects on the color picture you found in the book? That was just wonderful to behold. Thank you so much also for mentioning Su _____ (the book artist). Her work is so inspiring. You could use some of your cut out pages and do some projects like hers! I am signing up to be one of your followers. I saw your post over at "A Nest for All Seasons". Have you seen the "book bundles" some people are using for decorating? Goggle "Restoration Hardware book bundles" to see photos (they don't sell them any more) and Decor Chick.com January 6, 2011 blog post on destroying books.
ReplyDeleteFABULOUS use for a book! I absolutely adore it!!! My favorite part of your tutorial is folding down the pages near the end to give it a clean, finished look - it is brilliant! I'm definitely going to make these for my boys!!!
ReplyDeleteAlso wanted to say thank you for linking up to Tripped Up Thursday over at the Nest...I appreciate your support and hope to see you next week! I'm planning to feature your {awesome} project next week! http://anestforallseasons.blogspot.com/2011/08/tripped-up-thursday-its-bound-to-be.html
Thank you, everyone! It's a fun project. :D
ReplyDeleteMiss Kitty-- no Photoshop involved! (unless you count adjusting the brightness). I simply cut out the illustrations and folded them so that they stood upright. It should make more sense if you study the photo. I've got alot more of that up my sleeve!
Very clever and great idea to put to use so many old - and now often discarded - books. Love it! Thanks for sharing xo
ReplyDeleteLynda
Very cool! I just might have to try this with an old book or two we have sitting around.
ReplyDeleteWhat a great idea! This is so fun!
ReplyDeleteThanks for linking to "20 Below Thursday"!
Love this idea! You could make a book wreath out of all the leftover pages! :) Thanks for linking to Thrifty Thursday!
ReplyDeleteI've always wanted one of these, but could never make myself cut up the book! Guess I'll have to check out the thrift store for one I'm not so attached too ;)
ReplyDeleteVery cute :)) Anyone would be delighted to receive this as a gift..love it!
ReplyDeleteOh my gosh!! this is such a creative, smart... super cute idea!! Thanks for linking in!! Totally made my day.. Hope to see you again next Monday!!
ReplyDeleteWow! This is so creative and so much better than any of the absolutely fakey looking book hide-a-ways I find in stores. I am a new follower and would love for you to link up at my Savvy HomeMade blog party at http://www.homesavvyatoz.com/2011/08/14/blog-party-3/
ReplyDeleteI look forward to blogging with you!
I always wanted one of these when I was a kid. I know my son would love one, but I never really considered making one. I see a trip to the used bookstore in the near future:) I would love it if you would stop by and share this at the crafty link party going on right now at Lines Across My Face.
ReplyDeleteHope to see you soon,
Rachel
http://linesacrossmyface.blogspot.com/2011/08/cure-for-common-monday-4-craft-link.html
So fun!!! I love it!
ReplyDeleteWhat a neat idea - and a great tutorial too!
ReplyDeleteThanks for linking to a Round Tuit!
Hope you have a great week!
Jill @ Creating my way to Success
http://www.jembellish.blogspot.com/
I Love this project! Such a great idea...here lately I've been ripping off the covers of books and teastaining the raw edges leftover for lifts and levels. I'm lucky that I work for a law firm--the law library is always tossing huge books! Some even have pretty binding!
ReplyDeleteNow Following!
~Mikey @ Shabby French Cottage
www.shabbyfrenchcottage.com
See my kitchen featured in September 2011's Romantic Homes magazine!
This is so creative. ,thnks
ReplyDeletelove this, need some of these myself! thanks so much for sharing on Craft Schooling Sunday!
ReplyDeleteThis is such a labor of love! Thanks for linking up at Creative Bloggers' Party & Hop :)
ReplyDeleteThank you so much for linking up at Savvy HomeMade Monday. I hope you will party again tomorrow!
ReplyDeletethat's easy! you don't actually need to glue every pages?
ReplyDeleteNope, just glue along the outside and inside of the pages for a sturdy edge. :)
ReplyDeleteThis is fabulous! I have a huge old book I bought to make a book safe with last year, but it was just a hole cut into the middle of the book...this is much better! I'm glad I waited and hadn't mad mine yet! Now I'm motivated to make one of these!!
ReplyDelete