Power Tool Book Box-- It's a Start, At Least
April 17, 2012
This one is a little bit of a crafting fail-- but like all failures, I've learned from it. Someday I intend to use what I learned from this experiment and make a proper book box, but for now, here are my "lab notes," per se, if anyone else wants to put them to use.
Last month, I wanted to make a last-minute present for a friend (as in, I saw her at church that morning, remembered with a blush that it was her birthday, and wanted to make something for her that day). I also wanted to use POWER TOOLS, OH YEAH!
(Power tools are cool.)
(Please tell me you pictured the Doctor saying that.)
(Please tell me you pictured the Doctor saying that.)
I wanted to make her a book box. However, as I explained in the ordinary-book-box-tutorial, you use up two x-acto blades, kill your fingers, spend at least two hours cutting, and wind up with very ragged edges on the inside of the book. This is when I had an epiphany. POWER TOOLS, OH YEAH!
My dad is absolutely brilliant about letting us kids fiddle around with whatever we want to do with his garage full of tools, so as soon as we got home from church, I knocked several books of the shelf looking for a destroyable book (never desecrate a perfectly good book! please!), grabbed the screwdriver bag, and rushed across the cold yard into the garage, still wearing my church clothes. (By the way, doing this in church clothes is a bad idea.)
 |
| Note: the top few pages were cut out with an x-acto knife. Ignore that. |
I began with a book box I'd started on earlier-- the outer pages were already glued together. See the old tutorial for that.
First, I folded the book covers and a few pages back and drilled a hole in each corner of the book so that the scrollsaw blade could have some maneuvering space.
This caused some unfortunate separation of the pages. However, once the hollow is cut out of the book, you can also cut out this pileup of torn paper and the book will lie flat again.
I removed the blade from the scroll saw, threaded it through one of the drilled holes, and tried for five excruciating minutes to wrangle the book and blade into place. It finally worked.
Scrollsaws work by vibrating a blade up and down. Guess what the resident genius forgot to consider? Oh, yeah. The book pages might vibrate so much that 1) you can't hold onto the book, and 2) the scrollsaw turns into some sort of goblin that tries to shake its prey to death. Poor book.
Not just a poor book-- poor me. I snapped the blade in half while trying to make the scroll-saw-goblin behave. This is the point where I called my dad in tears, worried that he will be extremely upset that I just broke his power tool.
Did I mention my dad is brilliant about us using his power tools? He told me where he kept spare blades, and I went back to work. A different plan of attack was in order, however.
Laying a piece of scrap wood ontop did nothing.
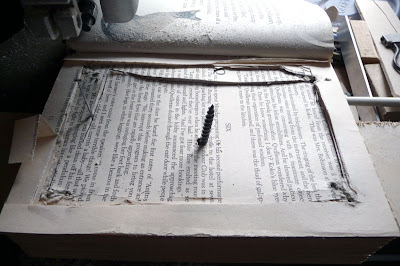
A short AHA! moment later, the resident genius came up with a plan. Screw scrap wood tightly to the top and bottom. (In hindsight, two screws would have worked even better. And this ought to be your FIRST STEP. Got it? It will save you mucho trouble.)
That did the trick. The resident genius rubbed her hands together in glee, re-drilled the holes, and started cutting.
*cough* You know, it might have been more genius-ier if I had traced the size and shape of the hole onto the scrap wood. I wouldn't be doing guesswork, and I might actually have wound up with straight lines and sharp corners.
I kept on a'cuttin'. You'll wind up with a giant stack of papers like this.
Did any of you notice that the book pages on my sister's artsy skirt had holes in the middle? I used these drilled-through pages to make her book skirt. :)
Tip: straight lines and sharp corners seem to be a near impossibility with books and scroll saws. A more organic, curvy design might turn out better.
Wear work clothes if you attempt this project. You shall be a mess.
Use an exacto knife to cut the hole out of the pages from the font of the book (the pages that were pulled back with the cover).
Ta-da! A book box!
It didn't turn out like I wanted-- but it was done in well under half the time of my old book boxes. However, I like where this is going. I can't wait to go out and try this project again-- but before I do, I might think things through a bit more. :)
(P.S. I seem to be having all sorts of technical issues. The links under my header got messed up, and I my best attempts to fix it didn't completely fix it, and now a few of the images in various posts are strange sizes and discolored (thanks, E, for letting me know). No idea what is going on but I'll get everything fine-and-dandy as soon as I can!)
(P.S. I seem to be having all sorts of technical issues. The links under my header got messed up, and I my best attempts to fix it didn't completely fix it, and now a few of the images in various posts are strange sizes and discolored (thanks, E, for letting me know). No idea what is going on but I'll get everything fine-and-dandy as soon as I can!)


2 comments